PHOTOGRAPHIC SETTING
On a camera there is an aperture an that is to see how wide a camera shutter opens, this is measured in F numbers meaning the lower the F number the wider the shutter is. For example if you set your camera to f/5 then the shutters will be close together but then if you set your camera to f/20 then it will be further apart. Aperture on a camera it is very important because when he low key lighting and you take a photo say for example in the dark room then the aperture would be really wide which is good because it is capturing loads of light which it good because the room is dark. However if you were to use a small aperture then you will need more natural lighting or if you were to go outside because it would be over exposure.
The shutter speed is how fast the lens closes and opens, if you were to set the camera to a high shutter speed, for example 1/9000, which is 9 thousand of a second then, it wouldnt give time for the light to enter the lens. However if you were to use a slower shutter speed of a second it would allow alot of light to enter it then causes blur.
Traditionally photographs that use film the ISO was the sign of how sensitive film was to light, measuring in numbers like 100, 200, 400 and 800, this also meant the lower the number the lower the sensitive of the film and finer the grain in the shots you were taking. Digital Photography ISO measures the sensitivity
DEPTH OF FIELD PHOTOS
ALTERNATIVE PHOTOS

This photo i like as a alternative portrait because it shows few little about the person with the jumper however the body language you can see some of his hand as if he is folding them which gives some sort of mystery to whoever is looking at it. The composition of this photo is very much straight but the jumper makes out to it that it is taken wonky. The high saturated red is a complimentary colour with this yellow logo but it looks gold from there being so much red, it could say what kind of personality that person as. Red is a very mixed emotion colour. The photo is focused meaning you can see ever detailed which can also be told in the person.
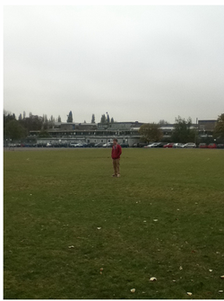
This photo i like for the pure fact it shows a good alternative portrait. Here are some reasons why it is a good alternative portrait... firstly it doesn't give much away, you cant see the facial expression of the person, however you can see how there body language is but thats all there giving away, so it gives that mystery vibe. Also the location in which the photo is taken, it doesn't show exactly where it is, you can only see that it is some kind of field with cars placed in the background. However its clear what colour clothing they are wearing as the colours in the clothing are complementary colour of red, which shows some characteristics towards the person standing in the middle. The composition is composed horizontal and vertical, the photo is half cut with the monotone grey and the saturated green cut in half, and the person standing in the middle.The grey sky can also shoe emotional in the person and how they felt when i took the photo. It also shows good shallow depth of field as i take the photo i am 40/50 ft from were the cars are, but he is about 20ft away, so it shows that there is free space between me and the person and the objects around that person which can also show feeling and emotions in the person. Also the photo is focused, even through it is a long shot it is focusing on that particular person and the background is also clear to show the location and give what some ideas of where it is as there is little clues.
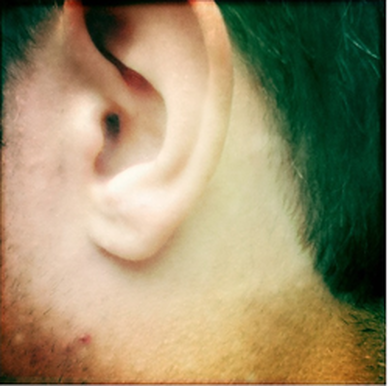
This photo is alternative photo, this photo shows a lot about the person. The composition shows so much in the person, the fact that is cut alittle of his ear off may show that he is hiding something. The hue is a complementary colour of green shown in the hair shows a little bit of personality and bright in his life maybe. There is definitely a contrast its very light around the ear and on the ear but it is dark around the face which could also spark a personality.
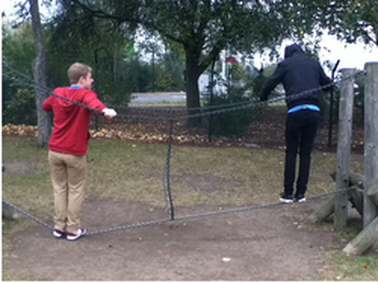
This photo shows alot about each other personality, the composition of the photo the guy on the left wearing complementary colours of red and without his hood up and on the other side he is wearing dark clothing and his hood up can show happiness and depression. It is out of focus which can show you an insight of how the picture is betrayed. The hue is very dull the only colour used is the guy on the left, its monotone background, focusing on the two guys, nothing distracting. The fact that the guy on the left is looking at the guy on the right it could be some sort of sign that he is trying to say to him. The content of the picture is some sort of play ground and they shouldnt be there.
ROYOGRAMS
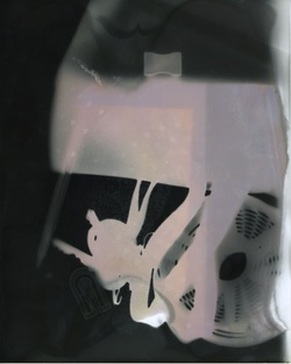
I think this photo that i did come out well apart from the objects merging together and also the pinky colour, this may have been due to the fact of not washing the photograph properly after using the fixer. The cylinder has x-rayed through the paper which is pretty cool and the keys have merged so it looks as if they went keys in the first place.

I think out of the two this royogram is the best one, due to the fact that it has a pattern around it and it had the perfect circle. The fact that is a dark circle shows that that was the bottom of the sieve and the composition works well here, i think its an improve from the last one i think i left it in the developer and fixer and just the right time.
EXPERIMENTING IN THE DARK ROOM - 3th October 2011
When in the dark room we were experimenting with objects and negatives. Firstly starting with the objects, we placed certain different shapes and size objects under the enlarger and placed photographic paper under the objects, this paper is light sensitive so as this was all happening we had to have the red light on at all times which is the 'safe light' which means you can have the paper out and not ‘fog’ the paper like you would in daylight or normal electric light. As the photo was under the enlarger i changed the time to 10 second, which means when i clicked the button the enlarger took the picture within 10 second, this also means it was exposure, however this is the effect i wanted it to have. The enlarger makes the paper without objects on it go black and where the objects are placed the paper goes white, depending on your object it can go dense and appear like a x - ray or if your object is a little see through it comes at translucent. After producing the picture i had to place the photo in 3 different chemicals, the first chemical was called the Developer which is a chemical that deals with image or film visible, its technique in doing this is that its reducing the silver halides which have been exposed to light to elemental silver in the gelatine matrix. Its placed in the developer for roughly 1 minute. It is then placed in the stop which the purpose for this is to stop the development process of the photo by washing of the developing chemical or neutralising it. This is placed for roughly 5 seconds before you can take it out. The last process in which we developed our photo was through the fixer which its job is to stabilises the image, removing the unexposed silver halide remaining on the photographic paper, leaving behind the reduced metallic silver that forms the image, making it insensitive to further action by the light. It is placed in the fixer for roughly 2 minutes. After the process we then washed it off all the chemicals with running water so then when it dried we didn't have any problems with the picture changing colour and and not fixing my image beca use otherwise if you dont wash it long enough may also be detrimental to your image. After washing off the chemicals we then had to use the squeegee this is to clean off the excessive water of the photo as it could smug the photo and ruin it. We then left them to dry and went on to the negatives.
Working with the negatives, firstly I did a test strip, I set the timer for 2 seconds and placed it in the enlarger, into a safe light by using a red filter to help me line up the paper and the glass plate negative, we then took the photo however we used a book or an object to cover some of the photo each shot we covered the photographic paper and developed it in the developer, stop and fixer and squeegee. When mine dried it come out with lines of different exposures this enables you to find out the correct exposure time. It is important to keep the aperture at one setting but also to be aware that aperture and time (shutter speed) are what determine the exposure just like in a camera. Once i made the test strip i checked the exposure that looked right and then went through the same process but using the correct amount of seconds for the glass plate exposures, my exposure time was 8 seconds and that was the right time as it come out with good amount of light and shadow.
Working with the negatives, firstly I did a test strip, I set the timer for 2 seconds and placed it in the enlarger, into a safe light by using a red filter to help me line up the paper and the glass plate negative, we then took the photo however we used a book or an object to cover some of the photo each shot we covered the photographic paper and developed it in the developer, stop and fixer and squeegee. When mine dried it come out with lines of different exposures this enables you to find out the correct exposure time. It is important to keep the aperture at one setting but also to be aware that aperture and time (shutter speed) are what determine the exposure just like in a camera. Once i made the test strip i checked the exposure that looked right and then went through the same process but using the correct amount of seconds for the glass plate exposures, my exposure time was 8 seconds and that was the right time as it come out with good amount of light and shadow.
TEST STRIPS
There are different exposures in the test strip so that i could what shutter speed see looked better in the photo. Deciding this i like the exposure thats in the middle i think the glass plate negative was straight but the light sensitive was slanted. I did this by placing a piece of card over 1/5 of the photo then moved the card to cover 2/5 then 3/5 and so on while increasing the shutter speed. The speed of 2 seconds each time worked well for me as it just got the right amount of light.
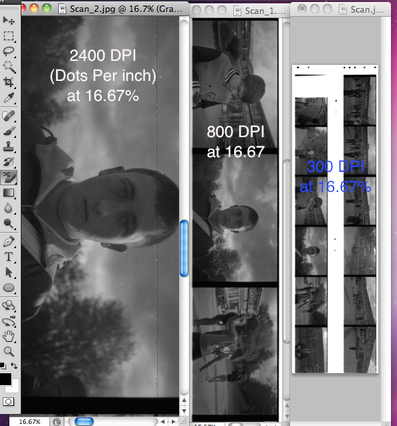
DEVELOPING 120mm
|
|
I produced a reel of 120mm of film which i then thread it through a spool which i found quite hard as it had to be dark because we was using sensitive film so i could not see anything. Once the film was in the spool we then had to turn the two sides together along the circle, which was difficult because it kept falling out. Once it was coiled up the chemicals could then reach the film development stage. However if we were to do it quickly it may ruin and effect the film. i then put it in the Paterson tank which has the chemicals that help develop the film. Tmax Deve was the developer we were using and we were using the Ilford FP5+. in the Patterson there was a hole in which i could put the developer in without it entering light. I then shook it up with the chemicals. After that i emptied the developer and waited about a 1 minute, i then emptied the stop and then put some fixer in the tank, i then left that for a few minutes then emptied the fixer, then i washed the tank out with water to wash the chemicals away. I then took the film out and used a squeegee and hung it out dry.
DOUBLE EXPOSURE
A contact sheet
There are a good way to select the best quality of photos and its alot easier to found out which ones arent so good. This is done by sticking roles of film together on the photographic photo and it exposures them at the same time.
